google-github-actions/authとは
Google Cloudの認証を実施するGitHub Actionsとしてgoogle-github-actions/authが提供されています。Actions上でgcloudコマンドなどを利用する前に認証で利用します。
このActionsではGoogle Cloud Service Account Key JSONによる認証とWorkload Identity Federationによる認証をサポートしています。長期間保存されるクレデンシャルをエクスポートする必要がなく、よりセキュアなWorkload Identity Federationの利用が推奨されています。
また現在Workload Identity Federationの認証は以下2種類があります。
- Direct Workload Identity Federation(推奨、本記事の内容)
- Workload Identity Federation through a Service Account
当初は後者のサービスアカウントを介した方法のみが提供されていました。サービスアカウントを用いないDirect Workload Identity Federationは2023/11のv2.0.0で追加された機能で、現在の推奨となっています。本記事ではDirect Workload Identity Federationについて記載します。
Direct Workload Identity Federationとは
Direct Workload Identity FederationではWorkload Identity PoolがGoogle Cloudリソースに対して直接IAMパーミッションを持っています。これによりサービスアカウントを使用せずに直接認証ができます。サービスアカウントは組織ポリシーによってはKeyを発行できてしまったり、権限次第では意図しないリソースで利用される可能性もあります。作らないことでセキュリティリスクの削減につながります。しかし、すべてのGoogle CloudリソースがprincipalSetアイデンティティをサポートしているわけではないようなので確認が必要です。

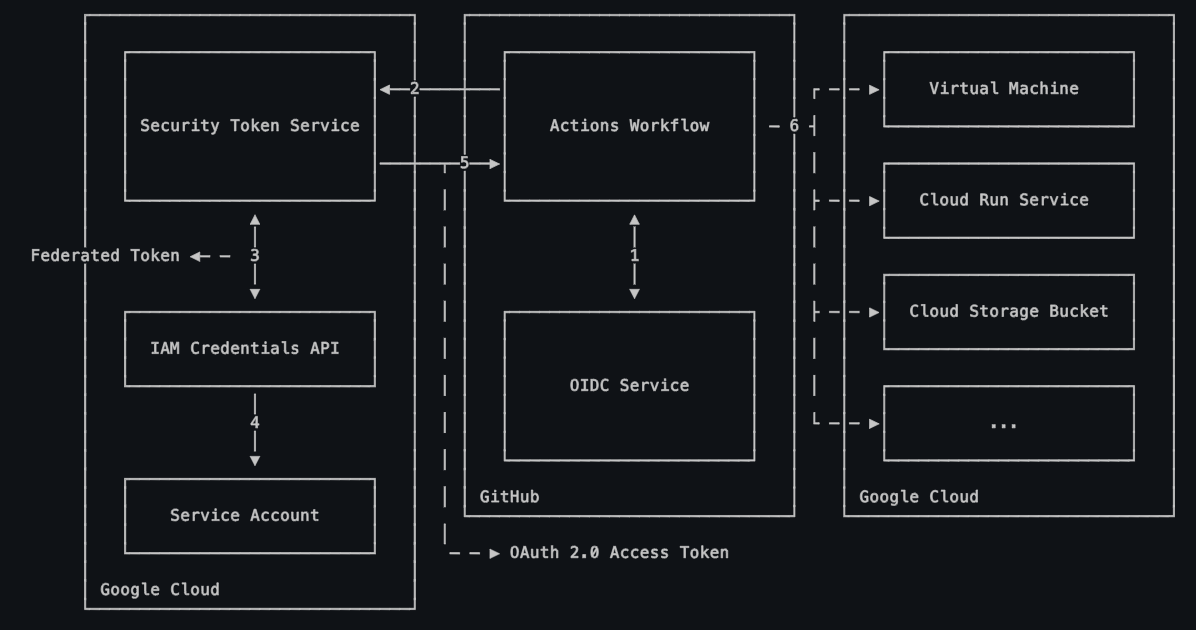
Workload Identity Federation through a Service Accountの場合は以下画像のようにService Accountが利用されていることがわかります。詳しくは引用元をご確認ください。
利用方法
それでは具体的な利用方法を説明していきます。
Workload Identity Poolを作成する
PROJECT_IDにはGoogle CloudのプロジェクトIDを指定して以下を実行します。
$ export PROJECT_ID=<your-project>

$ gcloud iam workload-identity-pools create "github" \
  --project="${PROJECT_ID}" \
  --location="global" \
  --display-name="GitHub Actions Pool"
実行するとWorkload Identity Poolが作成されます。
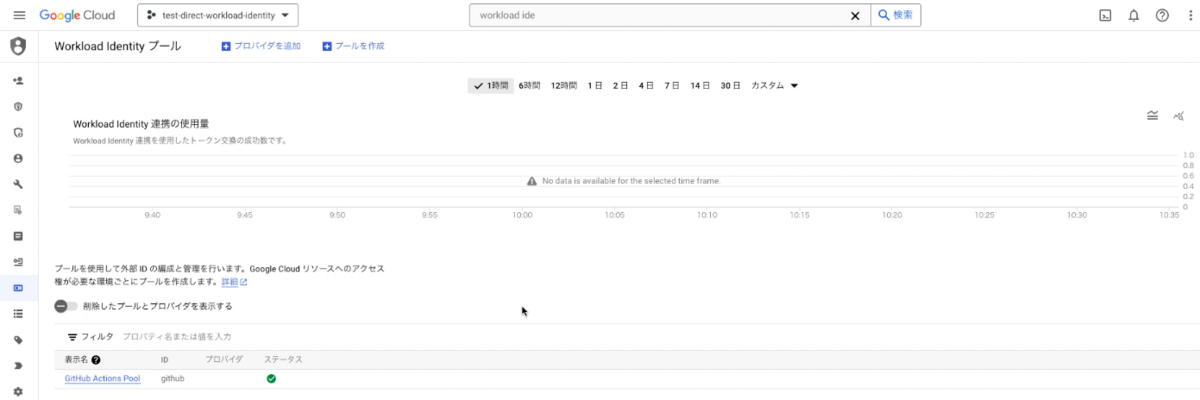
Workload Identity ProviderをPool内に作成する
GITHUB_ORGにはGitHubのオーガナイゼーションを指定して以下を実行します。例えば当記事用のサンプルリポジトリであれば paper2 になります。
$ export GITHUB_ORG=<your-github-org>

$ gcloud iam workload-identity-pools providers create-oidc "my-repo" \
  --project="${PROJECT_ID}" \
  --location="global" \
  --workload-identity-pool="github" \
  --display-name="My GitHub repo Provider" \
  --attribute-mapping="google.subject=assertion.sub,attribute.actor=assertion.actor,attribute.repository=assertion.repository,attribute.repository_owner=assertion.repository_owner" \
  --attribute-condition="assertion.repository_owner == '${GITHUB_ORG}'" \
  --issuer-uri="https://token.actions.githubusercontent.com"
attribute-mappingオプションではGoogle Cloud上で条件などに利用できるattributeとGitHubのOIDCトークンから取得できる情報をマッピングしています。
attribute-conditionオプションでは、Workload Identityの利用をGITHUB_ORGで指定したオーガナイゼーションに制限しています。IAMバインディングでさらにアクセスを制限することもできますが、制限が漏れると誰でもこのPoolが利用できてしまうので注意が必要です。基本的にはGitHubのオーガナイゼーションで制限しておくと良いでしょう。
実行すると以下のようにプロバイダが作成されます。

検証用のシークレットを作成する
検証で利用するSecret Managerのシークレットを作成します。当手順は検証で利用するためのもので必須ではありません。
echo -n "my super secret data" | gcloud secrets create my-secret --project="${PROJECT_ID}" \
    --replication-policy="automatic" \
    --data-file=-
上記ではmy super secret dataという超機密情報を格納したシークレットを作成しています。
Workload Identity Poolに権限を付与する
REPOにリポジトリ名を指定して以下を実行します。例えば当記事用のサンプルリポジトリであれば paper2/direct-workload-identity-federation-sample になります。
$ export REPO=<your-repository-name>

$ gcloud secrets add-iam-policy-binding "my-secret" \
  --project="${PROJECT_ID}" \
  --role="roles/secretmanager.secretAccessor" \
  --member="principalSet://iam.googleapis.com/${WORKLOAD_IDENTITY_POOL_ID}/attribute.repository/${REPO}"
上記では事前手順で作成した my-secret の取得権限をmemberに指定したPoolに付与しています。なお、GitHubのEnvironment機能を利用している場合、memberの指定が少し変わって...repository/${REPO}:environment:${ENVIRONMENT_NAME} となるので注意してください。
ワークフローを作成する
では実際にワークフローのコードを書いていきます。まずは認証に必要な情報を以下コマンドで取得します。
$ gcloud iam workload-identity-pools providers describe "my-repo" \
  --project="${PROJECT_ID}" \
  --location="global" \
  --workload-identity-pool="github" \
  --format="value(name)"

projects/175904811770/locations/global/workloadIdentityPools/github/providers/my-repo # 実行結果例
上記で取得したProviderのリソース名は以下のように利用します。
    # Add "id-token" with the intended permissions.
    permissions:
      contents: 'read'
      id-token: 'write'

    steps:
    - uses: 'actions/checkout@v4'

    - id: 'auth'
      uses: 'google-github-actions/auth@v2'
      with:
        project_id: 'test-direct-workload-identity'
        workload_identity_provider: '上記で取得したProviderのリソース名を指定する'
今回はサンプルとしてシークレットを取得するワークフローを作成します。コードは以下になります。
name: Get Secret
on:
  push:
    branches:
    - 'main'

jobs:
  get_secret:
    name: Get Secret from Secret Manager
    runs-on: ubuntu-latest
    # Add "id-token" with the intended permissions.
    permissions:
      contents: 'read'
      id-token: 'write'

    steps:
    - uses: 'actions/checkout@v4'

    - id: 'auth'
      uses: 'google-github-actions/auth@v2'
      with:
        project_id: 'test-direct-workload-identity'
        workload_identity_provider: 'projects/175904811770/locations/global/workloadIdentityPools/github/providers/my-repo' # 上記で取得したProviderのリソース名を指定する

    - name: 'Set up Cloud SDK'
      uses: 'google-github-actions/setup-gcloud@v2'

    - name: 'Get Secret'
      run: gcloud secrets versions access latest --secret="my-secret" # シークレットを読み取り。
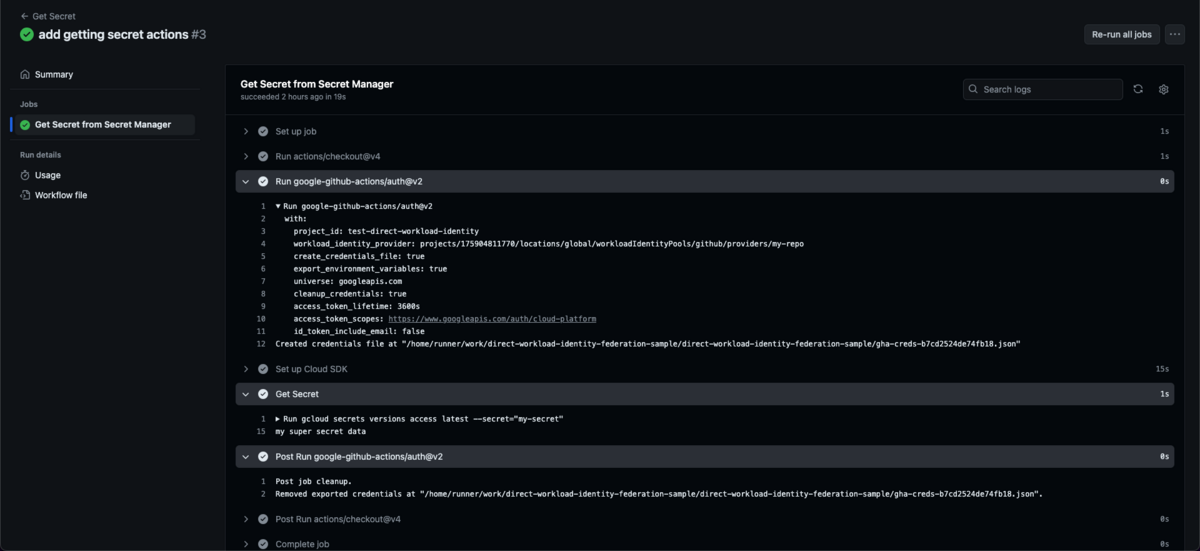
上記ワークフローをmainにプッシュした結果が以下になります。Get Secretのステップで超機密情報であるmy super secret dataが読み取れています。

また、以下の画像でわかるようにgoogle-github-actions/authで認証が成功し、最後にクレデンシャルを削除してくれているのも確認できます。
まとめ
GitHub ActionsからGoogle Cloudへの認証に利用するgoogle-github-actions/authのDirect Workload Identity Federationについて紹介しました。Workload Identity Federation through a Service Accountは非推奨になっているわけではないですが、新しく利用する場合はDirect Workload Identity Federationを活用すると良いでしょう。